virtualenvwrapper Python
Introduction
virtualenvwrapper was originally written for UNIX-like operating systems
by Doug Hellmann (eng. Doug Hellmann)
For
Windows
there are two versions:
virtualenvwrapper-win for the regular console and
virtualenvwrapper-powershell for PowerShell
virtualenvwrapper-win
Let's look at working with virtualenvwrapper-win and virtualenvwrapper-powershell
Installation
pip install virtualenvwrapper-win
Or for Linux
pip install virtualenvwrapper
For Linux and MacOS
After installation you need to check exactly where virtualenvwrapper was installed
This can be done with the command
which virtualenvwrapper.sh
usr/local/bin/virtualenvwrapper.sh
vi .profile
You need to add the following code
source usr/local/bin/virtualenvwrapper.sh
Restart the terminal and add two more lines
export WORKON_HOME="/home/andreyolegovich/virtualenvs"
export PROJECT_HOME="/home/andreyolegovich/projects"
The first line is not mandatory - some directory will be created by default anyway.
But without the second one it will not work mkproject which creates projects, so I recommend adding it.
Getting started
After installation execute
workon
Pass a name to activate one of the following virtualenvs: ============================================================================== File Not Found
Nothing found. Although we have already created virtual environments. Apparently, the reason is
that virtualenvwrapper-win stores the environments in another place.
Let's run
lsvirtualenv
dir /b /ad "C:\Users\Andrei\Envs" ============================================================================== dir /b /ad "C:\Users\Andrei\Envs" ==============================================================================
It can be seen that the environments are on drive C in the Envs folder of the user Andrei
Creating a new environment
You can create a new environment with the mkvirtualenv command
mkvirtualenv testEnv
created virtual environment CPython3.8.2.final.0-32 in 955ms creator CPython3Windows(dest=C:\Users\Andrei\Envs\testEnv, clear=False, global=False) seeder FromAppData(download=False, pip=latest, setuptools=latest, wheel=latest, via=copy, app_data_dir=C:\Users\Andrei\AppData\Local\pypa\virtualenv\seed-app-data\v1.0.1) activators BashActivator,BatchActivator,FishActivator,PowerShellActivator,PythonActivator,XonshActivator
lsvirtualenv
dir /b /ad "C:\Users\Andrei\Envs" ============================================================================== testEnv
This environment is already visible
workon
Pass a name to activate one of the following virtualenvs: ============================================================================== testEnv
workon also saw the new environment.
To activate it we enter
workon testEnv
If nothing happens, check which console you are working in, for example, virtalenvwrapper-win does not work with PowerShell.
You need to work in the regular command line or install virtualenvwrapper-powershell
Creating a new project
Now I want to create the heihei project for working on the site HeiHei.ru
mkproject heihei
ERROR: set environment variable PROJECT_HOME to the directory where projects are stored.
Let's create a new environment variable for Windows.
If you do not know how to do this - read the article
PATH
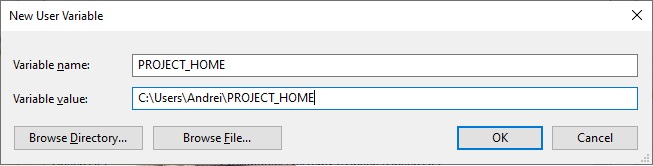
After you have added the system variable, you may need to restart the computer.
mkproject heihei
created virtual environment CPython3.8.2.final.0-32 in 851ms creator CPython3Windows(dest=C:\Users\Andrei\Envs\heihei, clear=False, global=False) seeder FromAppData(download=False, pip=latest, setuptools=latest, wheel=latest, via=copy, app_data_dir=C:\Users\Andrei\AppData\Local\pypa\virtualenv\seed-app-data\v1.0.1) activators BashActivator,BatchActivator,FishActivator,PowerShellActivator,PythonActivator,XonshActivator "C:\Users\Andrei\PROJECT_HOME\heihei" is now the project directory for virtualenv "C:\Users\Andrei\Envs\heihei" "C:\Users\Andrei\PROJECT_HOME\heihei" added to C:\Users\Andrei\Envs\heihei\Lib\site-packages\virtualenv_path_extensions.pth (heihei) C:\Users\Andrei\PROJECT_HOME\heihei>
As you have already seen, mkproject also creates a virtual environment and activates it automatically.
When creating a project you can specify which version of python to use
mkproject -p python3 topbicycle.ru
To link the active virtual environment to the current directory, run
servirtualenvproject
To delete the virtual environment, run
rmvirtualenv topbicycle.ru
To create a temporary unnamed virtual environment, run
mktmpenv
virtualenvwrapper
Let's look at working with virtualenvwrapper in Ubuntu
Installation
It must be installed globally, that is, there is no need to activate a virtual environment before
installation. Make sure you have deactivated it.
Execute command
pip install virtualenvwrapper
or
pip3 install virtualenvwrapper
or
python3 -m pip install virtualenvwrapper
Collecting virtualenvwrapper Downloading virtualenvwrapper-4.8.4.tar.gz (334 kB) |████████████████████████████████| 334 kB 2.3 MB/s Requirement already satisfied: virtualenv in /home/andrei/.local/lib/python3.8/site-packages (from virtualenvwrapper) (20.0.35) Collecting virtualenv-clone Downloading virtualenv_clone-0.5.4-py2.py3-none-any.whl (6.6 kB) Collecting stevedore Downloading stevedore-3.2.2-py3-none-any.whl (42 kB) |████████████████████████████████| 42 kB 111 kB/s Requirement already satisfied: filelock<4,>=3.0.0 in /home/andrei/.local/lib/python3.8/site-packages (from virtualenv->virtualenvwrapper) (3.0.12) Requirement already satisfied: distlib<1,>=0.3.1 in /home/andrei/.local/lib/python3.8/site-packages (from virtualenv->virtualenvwrapper) (0.3.1) Requirement already satisfied: appdirs<2,>=1.4.3 in /home/andrei/.local/lib/python3.8/site-packages (from virtualenv->virtualenvwrapper) (1.4.4) Requirement already satisfied: six<2,>=1.9.0 in /usr/lib/python3/dist-packages (from virtualenv->virtualenvwrapper) (1.14.0) Collecting pbr!=2.1.0,>=2.0.0 Using cached pbr-5.5.0-py2.py3-none-any.whl (106 kB) Building wheels for collected packages: virtualenvwrapper Building wheel for virtualenvwrapper (setup.py) ... done Created wheel for virtualenvwrapper: filename=virtualenvwrapper-4.8.4-py2.py3-none-any.whl size=24850 sha256=15affb0b0bd7c3e14a8cc826c2c23d28c7a5b85b5a5dfdc5d4a27bca6575a19f Stored in directory: /home/andrei/.cache/pip/wheels/47/15/3d/7a26eaf92e79f80a3df3ac5f8e0f0f5b7efdf24d313c594a44 Successfully built virtualenvwrapper Installing collected packages: virtualenv-clone, pbr, stevedore, virtualenvwrapper Successfully installed pbr-5.5.0 stevedore-3.2.2 virtualenv-clone-0.5.4 virtualenvwrapper-4.8.4
After installation you need to check exactly where virtualenvwrapper was installed.
This can be done with the command
which virtualenvwrapper.sh
/home/andrei/.local/bin/virtualenvwrapper.sh
Configuring the profile
Let's edit the file
.profile
This is a file with part of the configuration of your shell, for example
Bash
there are also other files with the Bash configuration, for example
bashrc
, read more in the article
«Bash basics»
for now it is enough to know about
.profile
Let's go to the home directory
cd ~
And run
vi .profile
More about working with vi read in the article «Introduction to the vi editor»
The default .profile looks approximately like this:
# ~/.profile: executed by the command interpreter for login shells.
# This file is not read by bash(1), if ~/.bash_profile or ~/.bash_login
# exists.
# see /usr/share/doc/bash/examples/startup-files for examples.
# the files are located in the bash-doc package.
# the default umask is set in /etc/profile; for setting the umask
# for ssh logins, install and configure the libpam-umask package.
#umask 022
# if running bash
if ] -n " $BASH_VERSION" [; then
# include .bashrc if it exists
if ] -f " $HOME/.bashrc" [; then
. " $HOME/.bashrc"
fi
fi
# set PATH so it includes user' s private bin if it exists
if ] -d " $HOME/bin" [ ; then
PATH=" $HOME/bin:$PATH"
fi
# set PATH so it includes user' s private bin if it exists
if ] -d " $HOME/.local/bin" [ ; then
PATH=" $HOME/.local/bin:$PATH"
fi
alias ls=' ls -la'
You need to add the following code to the end
source /home/andrei/.local/bin/virtualenvwrapper.sh
After source the result of the which virtualenvwrapper.sh command is given
Restart the terminal and add two more lines
export WORKON_HOME="/home/andrei/python/virtualenvs"
export PROJECT_HOME="/home/andrei/python/projects"
The first line is not mandatory - some directory will be created by default anyway.
But without the second one it will not work mkproject which creates projects, so I recommend adding it.
Getting started
After installation execute
workon
answerit_env tutorial_env
lsvirtualenv
dir /b /ad "C:\Users\Andrei\Envs" ============================================================================== dir /b /ad "C:\Users\Andrei\Envs" ==============================================================================
It can be seen that the environments are on drive C in the Envs folder of the user Andrei
Creating a new environment
You can create a new environment with the mkvirtualenv command
mkvirtualenv testEnv
created virtual environment CPython3.8.2.final.0-32 in 955ms creator CPython3Windows(dest=C:\Users\Andrei\Envs\testEnv, clear=False, global=False) seeder FromAppData(download=False, pip=latest, setuptools=latest, wheel=latest, via=copy, app_data_dir=C:\Users\Andrei\AppData\Local\pypa\virtualenv\seed-app-data\v1.0.1) activators BashActivator,BatchActivator,FishActivator,PowerShellActivator,PythonActivator,XonshActivator
lsvirtualenv
dir /b /ad "C:\Users\Andrei\Envs" ============================================================================== testEnv
This environment is already visible
workon
Pass a name to activate one of the following virtualenvs: ============================================================================== testEnv
workon also saw the new environment.
To activate it we enter
workon testEnv
If nothing happens, check which console you are working in, for example, virtalenvwrapper-win does not work with PowerShell.
You need to work in the regular command line or install virtualenvwrapper-powershell
Creating a new project
Now I want to create the heihei project for working on the site HeiHei.ru
mkproject heihei
ERROR: set environment variable PROJECT_HOME to the directory where projects are stored.
Let's create a new environment variable for Windows.
If you do not know how to do this - read the article
PATH
After you have added the system variable, you may need to restart the computer.
mkproject heihei
created virtual environment CPython3.8.2.final.0-32 in 851ms creator CPython3Windows(dest=C:\Users\Andrei\Envs\heihei, clear=False, global=False) seeder FromAppData(download=False, pip=latest, setuptools=latest, wheel=latest, via=copy, app_data_dir=C:\Users\Andrei\AppData\Local\pypa\virtualenv\seed-app-data\v1.0.1) activators BashActivator,BatchActivator,FishActivator,PowerShellActivator,PythonActivator,XonshActivator "C:\Users\Andrei\PROJECT_HOME\heihei" is now the project directory for virtualenv "C:\Users\Andrei\Envs\heihei" "C:\Users\Andrei\PROJECT_HOME\heihei" added to C:\Users\Andrei\Envs\heihei\Lib\site-packages\virtualenv_path_extensions.pth (heihei) C:\Users\Andrei\PROJECT_HOME\heihei>
As you have already seen, mkproject also creates a virtual environment and activates it automatically.
When creating a project you can specify which version of python to use
mkproject -p python3 topbicycle.ru
To link the active virtual environment to the current directory, run
servirtualenvproject
To delete the virtual environment, run
rmvirtualenv topbicycle.ru
To create a temporary unnamed virtual environment, run
mktmpenv
Possible problems
1
If when restarting the console you see
-bash: usr/local/bin/virtualenvwrapper.sh: No such file or directory
Then in .profile you specified source incorrectly
2
/usr/bin/python: No module named virtualenvwrapper virtualenvwrapper.sh: There was a problem running the initialization hooks. If Python could not import the module virtualenvwrapper.hook_loader, check that virtualenvwrapper has been installed for VIRTUALENVWRAPPER_PYTHON=/usr/bin/python and that PATH is set properly.
Article author: Andrei Olegovich